“Circle”
The "Circle" command
![]() allows us to create this shape in various ways,
allows us to create this shape in various ways,
activating this command, AutoCAD is asking us to insert a point corresponding to the center of the figure, we then click the left mouse button on the screen in a random, or if necessary using the "snap to object" to refer to other objects already in the drawing.
After that, you must enter a numerical value that will determine the "radius" of our circle.
For example, type 50 and confirm with "enter" key or the right mouse button.
At this point we have created the circle and the command is completed.
Now repeat the command and determine the center of the circle again, but before putting the new range we look at the "command line".
As you can see the program writes: "Specify radius of circle or [Diameter]:".
The words in brackets [Diameter] provides the option to enter the diameter of the circle instead of the radius.
To use this option we have to type the letter in the word in brackets is written in capital letters, in this case is the "D".
Now instead of typing the number of the radius, write the letter d, and then hit enter, now on the "command line" appears:
"Specify diameter of circle <100.0000>:", that specify the diameter of the circle <100.0000>.
The number showed between signs < > is the last value entered to create a circle and since we first posted a radius of 50 corresponding diameter is 100, then the program will display this value.
Now if you hit "enter" without entering other values, we will create a circle exactly the same, but if we type again 50 and then hit "enter", we will create a circle of 50 diameter units, so it will be half the size of the one done previously.
We can create a circle in three other ways, look the "command line" after activating the command, we see that Autocad suggests:
"_circle Specify center point for circle or [3P/2P/Ttr (tan tan radius )]:".
In addition to entering the center of the circle, in square brackets are three other options [3P/2P/Ttr].
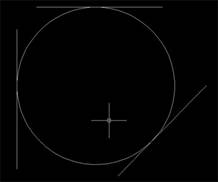
3P = circle through three points.
Writing this option and then pressing enter, we should put three points in the drawing for which will create a circle.
For example, having three segments in space, you can create a circle that is tangent to each of these.
Example:
- Click the circle command ![]()
- Type "3P" and then press "enter"
- Insert the three points using snap "tangent"
![]()
on each of the three lines .
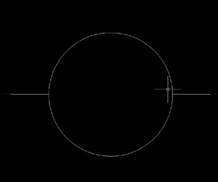
2P = circle between two points.
After entering this option we can put on the screen between the two points which will create the circle.
These two points can be vertices (endpoints) of two lines .
Example:
- Click the circle command ![]()
- Type "2P" and then press "enter"
- Insert the two points using snap "endpoint"
![]()
on vertex of two lines.
Ttr = tangent, tangent, radius.
Having two converging segments, this command allows us to create a circle that is tangent to these and having a radius determined by us.
Example:
- Click the circle command ![]()
- Type "t" and press "enter"
- Click on the two converging lines (in this case does not matter to enable the snap tangent, because it is already part of the command)
- Type the desired radius and press enter.
Under the fixed radius the circle can be drawn out of the segments, but will remain in projection tangent to them.

These last three examples described may be useful but generally used less frequently than normal circle: center, radius ".
Of the three probably the most used can be "2P" two points.
Tweet