“Hatch”
The “Hatch” command is used to fill the closed figures, with patterns of various kinds.
The area to be filled can theoretically be of any shape and may be bounded both by a polyline that by normal lines, the only rule to be respected is that the figures to be filled must be perfectly closed, otherwise the pattern will not be created.
In fact, with the latest versions of AutoCAD, you can set a tolerance, below which, although a figure to be fill was not properly closed the program still managed to create the pattern, however it is advisable to respect the basic rules.
For closed figure so I do not mean a geometry independent, such as a single polygon, but also an area within a more complex design, bounded by lines that intersect.
We can then fill a drawing of a square, as well as a square area in the drawing of a chessboard.
Another feature to keep in mind, about the example of the ‘chessboard’, is that AutoCAD to create patterning process all enclosed areas that will be visible in the drawing area, then the visible objects on the screen of our computer.
If we select a picture of the chessboard fully displayed on the screen and wanted to fill a square of this, when we are going to select, AutoCAD will process all the other squares, losing more time.
However, once this process is complete and the square is selected, we will now can select more, this time very quickly because all the visible areas have already been pre-processed.
Whit the ‘chessboard’, so this can benefit us because we want probably fill half of the net with the squares.
But if we were facing a more complex and large design, such as the drawing of a floor, which also contains arcs or circles to his internal, the processing time to fill one part with the hatch, while it is fully displayed on the screen, might get quite long.
It will therefore be convenient to perform a zoom on one or a few parts to be fill before applying the hatch, then fill all the areas concerned in several steps.
Let's see how to implement this tool.
Draw a closed geometric figure on the screen, circle or rectangle.
Then activating the command "hatch" with its button
![]() , the following window will appear:
, the following window will appear:
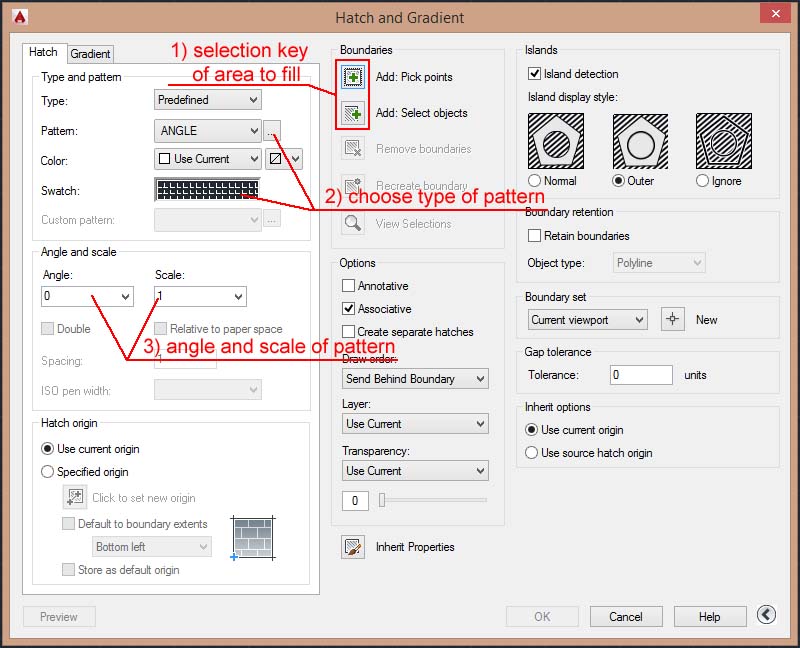
This window is divided into several sections:
“Type and pattern”
In this first section, choose what type of patterning we're going to use, clicking on the small window next to the word “Swatch”, where is a preview of the pattern used, it will open another window on which we will choose the type of pattern to use:
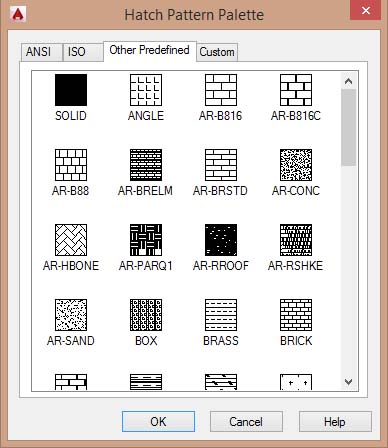
In this window there are some tables, that contain many types of patterns, to select, make just a double click on what we want to use.
“Angle and scale”
In this section we will decide the scaling factor and if necessary the angle of rotation, according to which the pattern is drawn.
Keep in mind that if we use a scale too small, compared to the area to be fill, AutoCAD fails to generate the pattern; same thing if the scale is too large, the hatch will not be displayed.
However, you can enter decimal values (0.1) or hundredths (0.01) and so on.
As it regards the angle of rotation, remember should be considered in a counter-clockwise direction.
“Boundaries”
With the first two buttons of the “boundaries”, we select the area to fill:
“Add: Pick points”
After we pressed, click inside the area (or areas) to be fill, so that the program process and select it, highlighting its edges *.
* Based on the areas to be processed that will be present on the screen, right now, before starting to process them it may happen that you are asked on the command line if you really want to continue with the operation. Then we read:
Do you really want to do this? <N>
At this question, type Y followed by Enter, in order to continue the elaboration of the area to fill.
We see the second key:
“Add: Select Objects”
After click it, we must select lines or shapes that enclose the area to fill.
Run one of these two commands and selected the area to fill, then press “Enter”, (or right click > Enter) to confirm the selection and return to the main window of the command.
On this window, click the bottom left button “preview”, and our pattern will displayed in the selected area.
At this point if you hit “Enter”, the pattern is confirmed and exits the command, if we want to make other changes, the scale or angle of rotation, press the “Esc” key on your keyboard to go back to the previous window and we can change the settings again.
Using the new interface with the “ribbon”, at least with AutoCAD 2015/2016 the management of the “Hatch” is slightly different.
By activating the tool, see the following bar to manage the command:
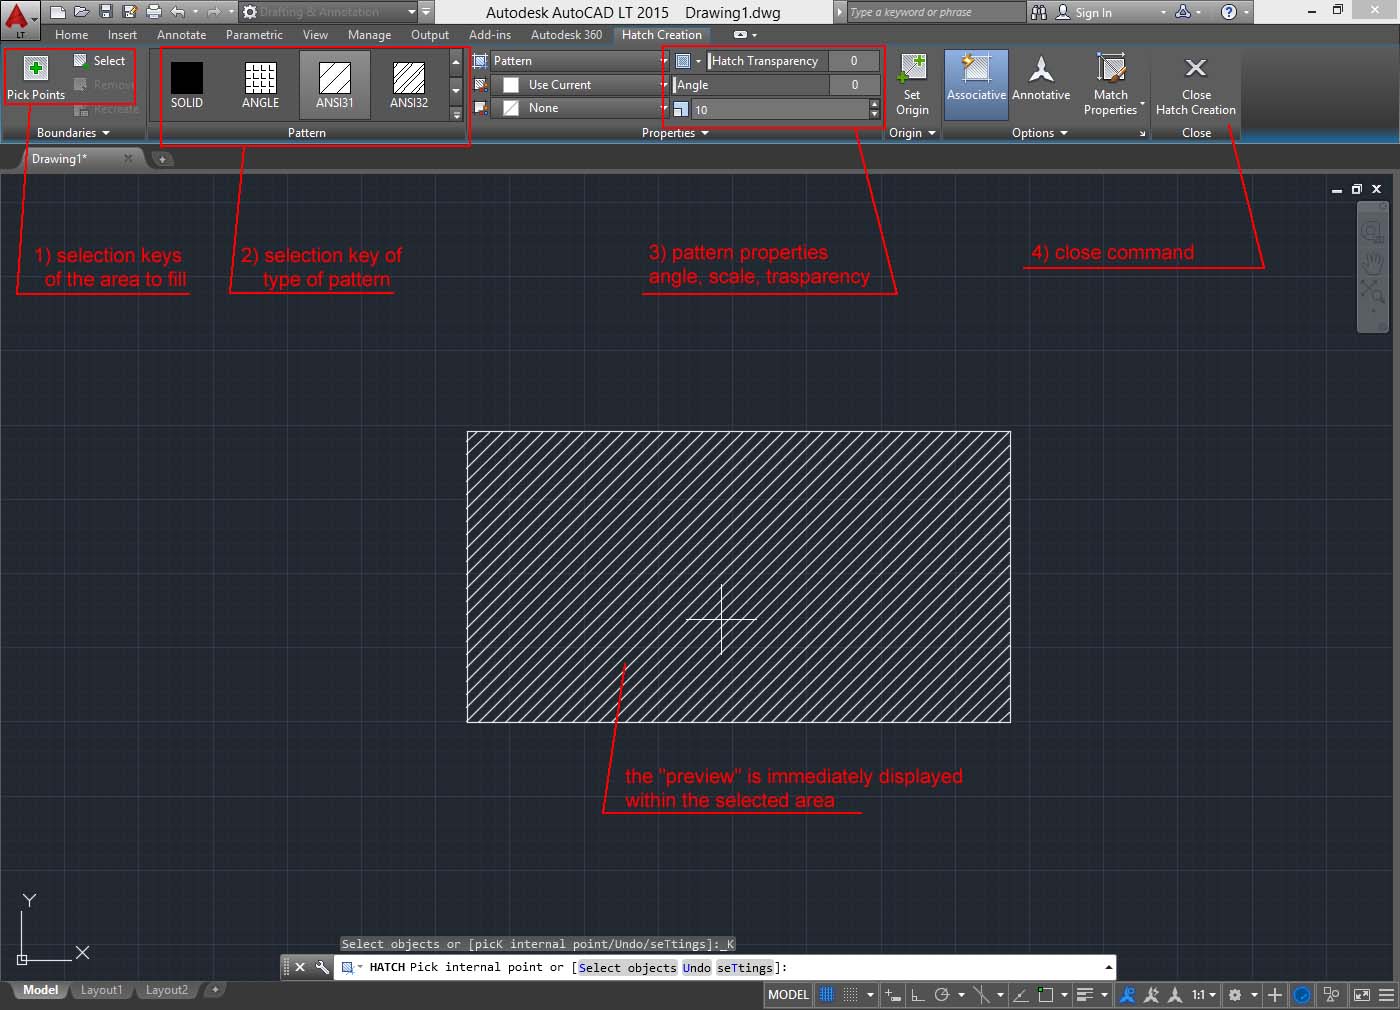
Summary:
- Start the command "hatch" ![]()
- Sets the type of texture or pattern, scale and rotation if necessary.
- You select the area with "pick points" or "select objects"
and press enter to confirm the selection
- Now press "preview"
- Press Enter again to confirm the pattern and exit the command
On the hatch manager window, there is also the sections “Options” and “Hatch origin” and clicking the little arrow key at the bottom right, it can expand or reduce the main window, showing more options.
At the moment, left out to not create too much confusion, I just add an explanation of the first flag “Associative” in the “Options” box.
In practice, an “associative” pattern, can be stretched via the “stretch” command, with its perimeter, while a hatch created by the “associative” removed it can’t, but will remain fixed.
Tweet