Part 3
OBJECT SNAP AND MODIFY TOOLS
Object Snap.
We will now see a very useful feature of Autocad: "object snap" , this utility allows us to draw accurately and faster.
Suppose you have drawn a line and now you will want to do another one, that starts exactly at one end, or in the middle of the line already done.
It appears, therefore, the need to "attach" the second line to the existing first, but how do we combine it with precision?
If we go to the eye may appear to
work and the two lines are joined, but doing a zoom closer to the point of
union will be that it is not so, even if only slightly.
We must ensure however that the lines are perfectly combined in the desired location.
To do this we must serve the "Object Snap" that are nothing but a kind of magnet that allows us to interact with various objects in the drawing of their second set of points, such as the end or the center of an object, highlighting these issues with special symbols that appear at the time of their intervention at the point concerned the design.
The "snap" has its own special toolbar that can be made visible or invisible by clicking the right mouse button on any of the existing toolbar and selecting the "Object Snap" in the menu that appears.
Here it is:

Each key corresponds to a different function, we see the main
![]() = Endpoint . Corresponds to the ends of lines or arcs and angles of geometric figures.
= Endpoint . Corresponds to the ends of lines or arcs and angles of geometric figures.
When activated on the screen a yellow square on the end checked.
![]() = Midpoint . Corresponds to the midpoint of a line, arc, or one side of a geometric figure.
= Midpoint . Corresponds to the midpoint of a line, arc, or one side of a geometric figure.
Its activation appears a yellow triangle at the point selected.
![]() = Intersection. Corresponds to the point of intersection between two lines.
= Intersection. Corresponds to the point of intersection between two lines.
Its activation appears similar to a cross "X" at the point selected.
![]() = Center. Corresponds to the center of a circle, an arc or an ellipse.
= Center. Corresponds to the center of a circle, an arc or an ellipse.
A circle to its activation appears
![]() = Quadrant. Corresponds to the end of the circle, an ellipse or an arc, compared to the X and Y axes UCS.
= Quadrant. Corresponds to the end of the circle, an ellipse or an arc, compared to the X and Y axes UCS.
Its activation appears a small yellow diamond.
![]() = Tangent . Corresponds to the tangent on a circle, an ellipse or an arc, compared to the point where you take a line.
= Tangent . Corresponds to the tangent on a circle, an ellipse or an arc, compared to the point where you take a line.
Its activation appears a circle with a dash above.
![]() = Node . The node corresponds to a point that can be drawn (we have not seen it yet) or even the definition points of dimensions (these are also to be seen) and the center of the text of the same.
= Node . The node corresponds to a point that can be drawn (we have not seen it yet) or even the definition points of dimensions (these are also to be seen) and the center of the text of the same.
Its activation appears a circle with a cross in the center.
![]() = Perpendicular . Corresponds to the perpendicular to an object from the point from which you take a line.
= Perpendicular . Corresponds to the perpendicular to an object from the point from which you take a line.
It allows us to bring a line perpendicular to another, even without going to meet her.
The symbol that distinguishes it is when you turn a corner with a square inside.
![]() = Nearest. With this command you can select any point on an object. Its activation symbol appears like an hourglass.
= Nearest. With this command you can select any point on an object. Its activation symbol appears like an hourglass.
![]() = Snap to None. Clicking on this will temporarily disable all snap, useful when working with ' AutoSnap active, and soon we shall see.
= Snap to None. Clicking on this will temporarily disable all snap, useful when working with ' AutoSnap active, and soon we shall see.
Well the use of object snap is very simple, and takes place within the various commands of AutoCAD.
For example, after activating the command line, before selecting the first point of this, you can click on the snap "midpoint"
![]() and then establish the first point of the line to be built exactly on the midpoint of another, then you can still select another snap, such as "endpoint"
and then establish the first point of the line to be built exactly on the midpoint of another, then you can still select another snap, such as "endpoint"
![]() and then go to select the second point of the line at one end to another.
and then go to select the second point of the line at one end to another.
So for the other object snap according to their related functions.
You have to do some tests with the snap, then we will see one more important benefit you will facilitate a lot of snap in their use, it 's AutoSnap.
![]() Osnap Settings.
Osnap Settings.
By clicking on the last snap of the toolbar button, opens the following window:
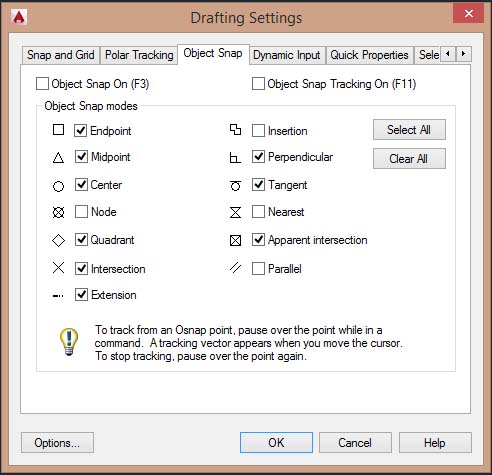
By checking the first check box in the upper left corner where it says “Object snap on (F3)”, you enable or disable the AutoSnap.
As you see for each item of the object snap, is show on the left the symbol that appears on the screen when it is activated and you need to precisely identify the various types.
Check the box to those that you use mostly during the design, in this way they will be activate automatically on joining point.
Set them as shown, and then click OK.
At this point the AutoSnap is set and active, which means that when we use any drawing tool that requires you to establish points on the screen, every time you approach the cursor to a point that AutoCAD will recognize as being equal to one set of snap, this will automatically show the relative symbol of snap.
Then you can select precisely the desired point without having to go every time to choose needed snap on the toolbar, comfortable isn't it?
Once set, you can enable or disable the “Autosnap” by pressing the "F3" key on the keyboard or by clicking on the dedicated button on the Bottom bar.
(On older AutoCAD by clicking on the button showing the word "OSNAP" on the bottom bar).
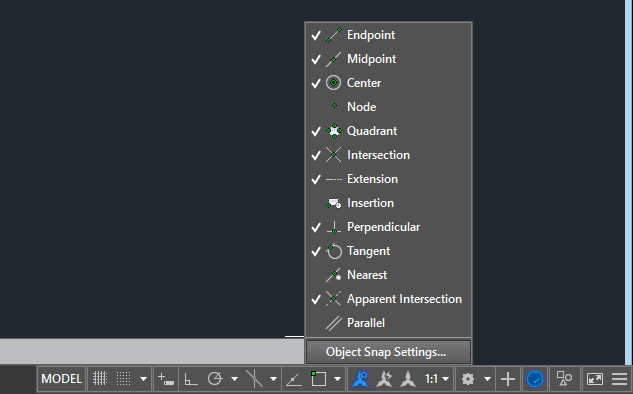
On newer AutoCAD clicking the arrow beside the “sanp” button on the bottom bar, you can set the automatic snap in menu that appears, or access to the window “Object Snap Settings...”
These tools are essential to draw with precision, do some tests, drawing lines and joining them with the other, with both AutoSnap and singular snap at once.
When you select the snap individually, note that on the command line is written the newly activated, which will be valid only for next selection.
If you select the wrong snap, you can choose another by clicking on it twice. (Look always on the command line that tells you what you choose).
With the AutoSnap active, you can also temporarily select a different snap than those set automatically, by selecting it on the toolbar.
In this case, it will be active for only one selection.
Tweet